

This post may contain affiliate links. Please read our disclosure policy for more information.
Once you’ve started your blog or website, one of the first and most important tools you’ll want to create and set up is Google Analytics.
If you haven’t started a blog yet, you can follow this easy step by step tutorial here that is meant to help total beginners like yourself start.
In this post, I am going to show you step by step how to set up a Google Analytics account.
Setting up Google Analytics for your website is simple and requires only 2 main steps:
- Creating a Google Analytics account (only 8 simple steps in the tutorial below)
- Connecting your Google Analytics account with your website on WordPress (only 5 simple steps in the tutorial below)
For those of you who don’t know yet, Google Analytics is a free application and it allows you to track your daily visitors and their browsing behavior.
You’ll have access to data such as pageviews and where they’re coming from (e.g. Google, Bing, Yahoo, Pinterest, Facebook, Instagram, Twitter, etc.), unique users, their location, gender, age group, interests, hobbies, etc.
All of this information will help you, as a website owner, or blog content creator, understand your readers, customers, and visitors better.
Having access to analyze this data will help you grow your website and blog. Depending on your business goals, this will help you create content, products, and offer services on your website that tailor to your visitors’ wants and needs.
Now that you understand how and why Google Analytics will be a useful tool and application for your blog, website, or business, let’s help you create and set up an account!
1. How To Create And Set Up A Google Analytics Account
Again, signing up for and using Google Analytics is free!
All you need is to have a Google account or Gmail to get started. If you are a beginner, I recommend creating a new Google Gmail account for your blog or website if you haven’t already done so.
Step 1: Go to Google Analytics here.
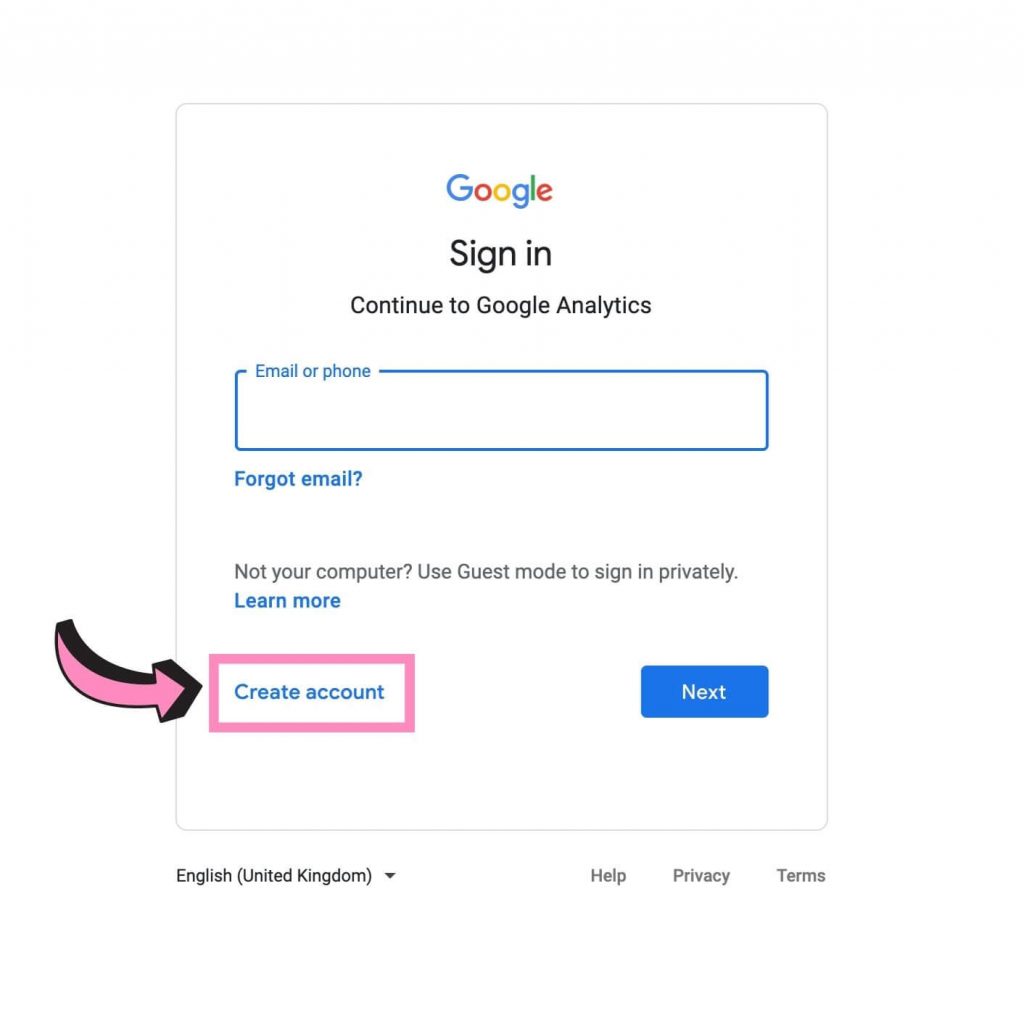
Step 2: Sign in using your Google account information and click on the “Next” button.
This next screen will ask you to enter your password. If you don’t have a Google account, you can create a free account by clicking on the “Create account” button.
Step 3: Click the “Set up for free” button.
If you haven’t created an account before, you will see this screenshot, and you can click on the “Set up for free” button. But if you already have an account, and once you’re logged in, click on the “Start measuring” button.

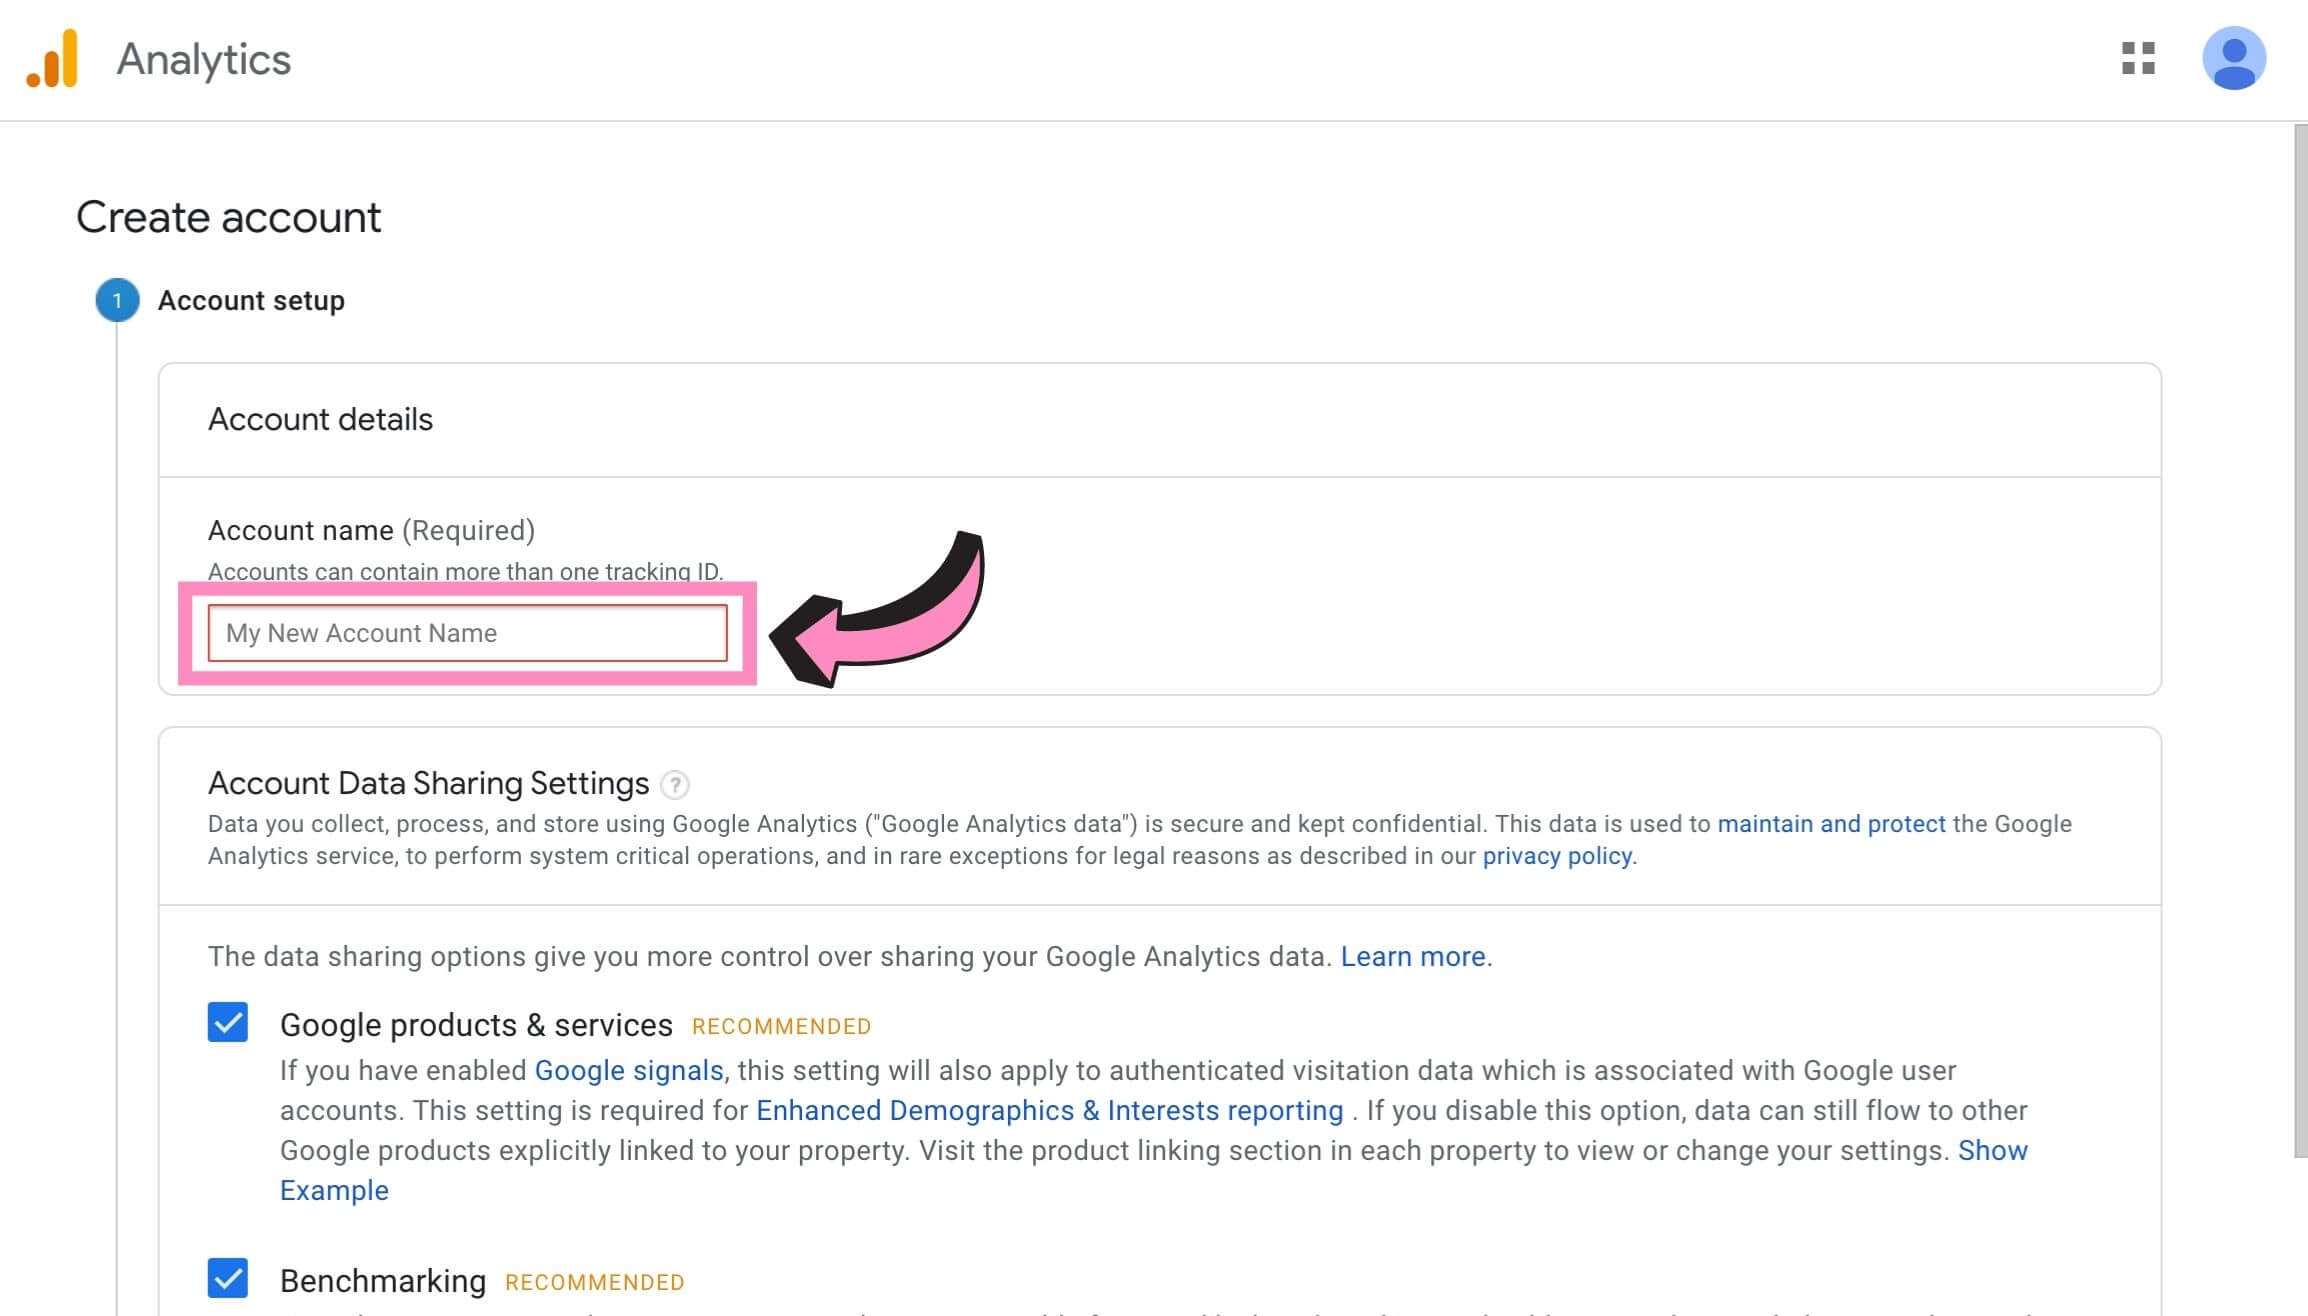
Step 4: Fill in “My New Account Name” in the boxed field.
Enter the account name you want to use in the Account name field and select your Account Data Sharing Settings. Click on the “Next” button when you’re done.
The account name can be the name of your blog or business name. For the Account Data Sharing Settings, I selected the recommended settings.
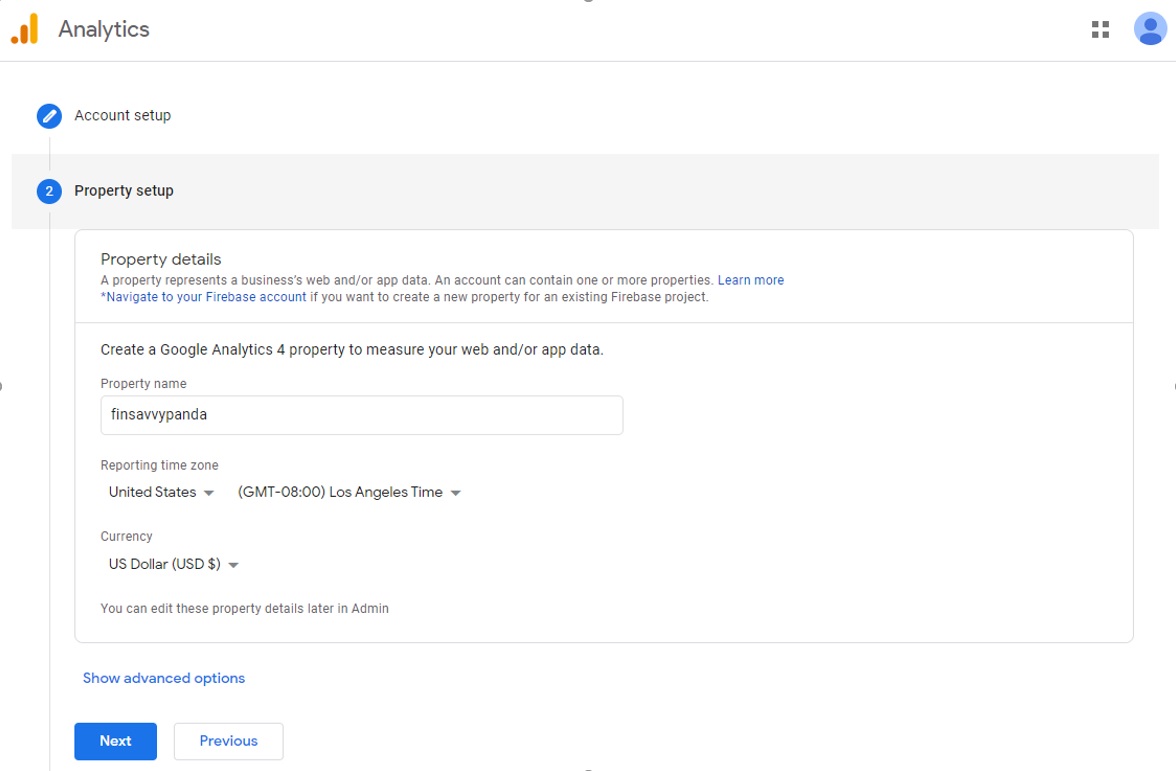
Step 5: Create a Google Analytics property.
Type in the name you want to use in the Property name field (the property represents your website). Your Property name can be your blog name or whatever you want to call it. For example, I used finsavvypanda because that is my blog name.
Select your Reporting time zone and Currency preferences. Click on the “Next” button when you’re done.
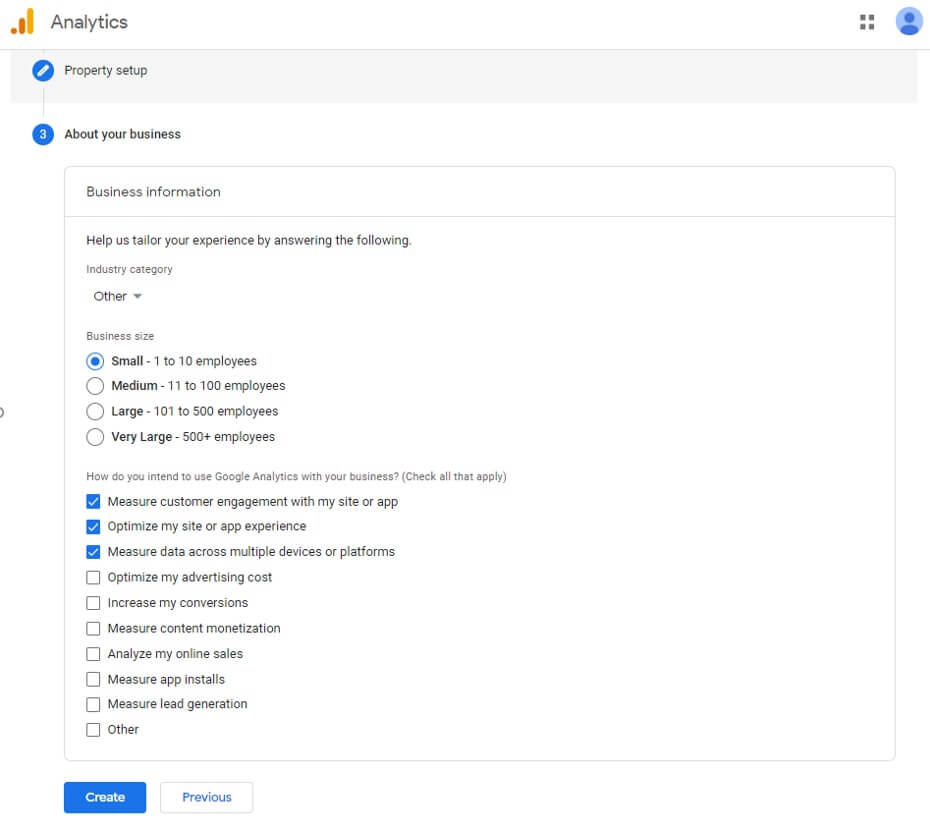
Step 6: Go through the Property setup.
Providing information about your business or website is optional. Completing these fields is not required to set up Google Analytics.
If you want to provide this information, select the options that best describe your business (i.e., Industry category, Business size, What do you want to achieve with Google Analytics, etc.).
Once you’re done, click on the “Create” button.
Step 7: Google Analytics Terms of Service Agreement.
Check off all the required boxes for Google Analytics’ Terms of Services and then click the “I Accept” button.

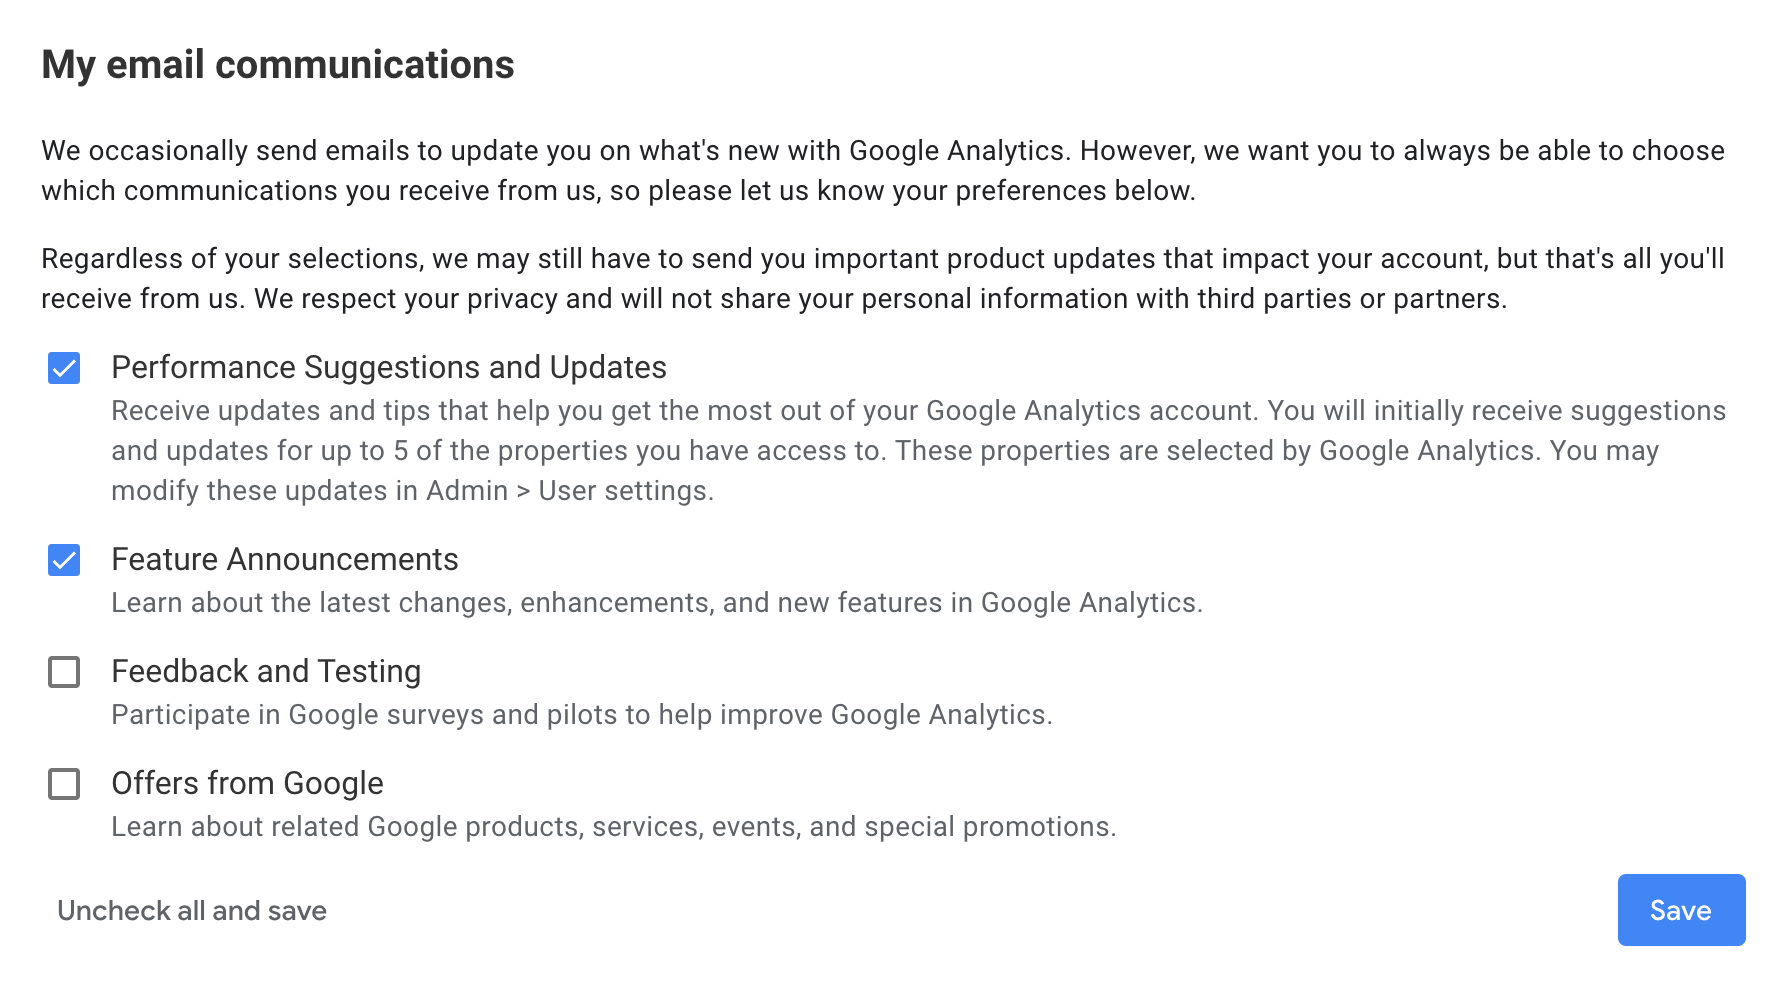
Step 8: Your email communication preference.
Select your preferences for email communications with Google Analytics and then click on the “Save” button.
You can select all or select none for this part. It’s entirely up to you.
 At this point, your Google Analytics account is created!
The first page Google Analytics brings you to is the Admin page. This is where you’ll find your unique Google Analytics measurement ID.
The measurement ID is the key to connect your WordPress website with Google Analytics.
You can always find your Google Analytics measurement ID by going to your “Google Analytics dashboard homepage > Admin > Data Streams (under the “Property” box) > Click on your website.”
There’s just one more thing you need to do to complete your Google Analytics setup. And that is to install Google Analytics on your WordPress website.
2. How To Install Google Analytics on WordPress
There are various ways to install Google Analytics on WordPress, but I’ll show you how to use the Insert Headers and Footers plugin.
This method of installing Google Analytics is great because there’s no coding involved, and you don’t need to edit your WordPress theme files.
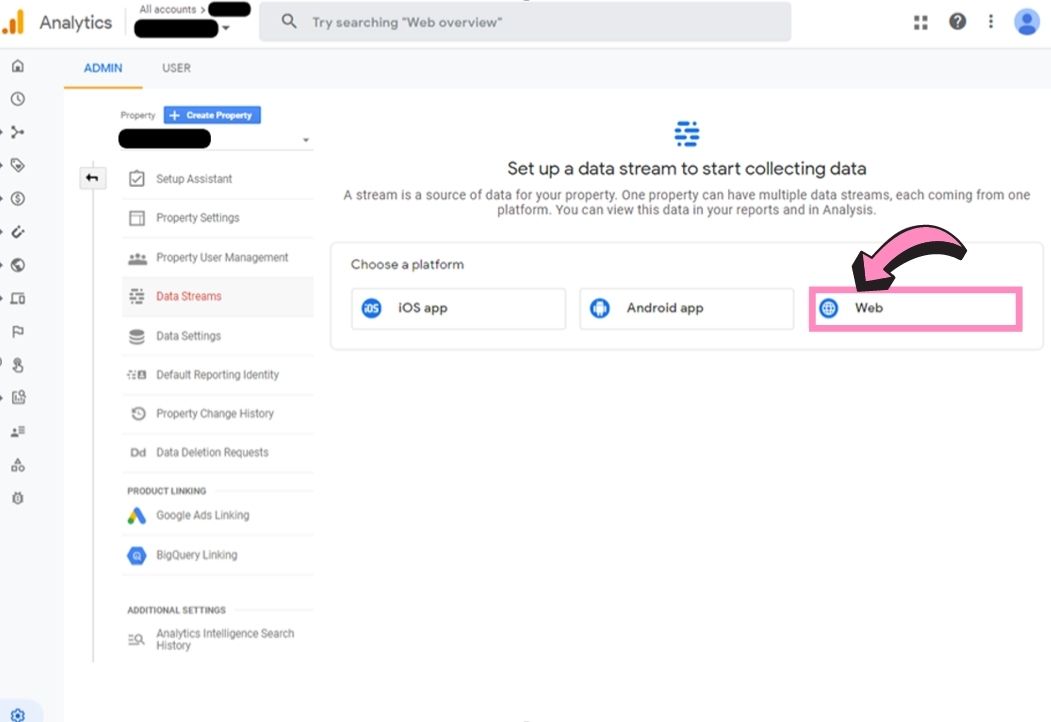
Step 1: Click on the “Web” icon.
Under the “Data Streams > Choose a platform” section, select the “Web” option.
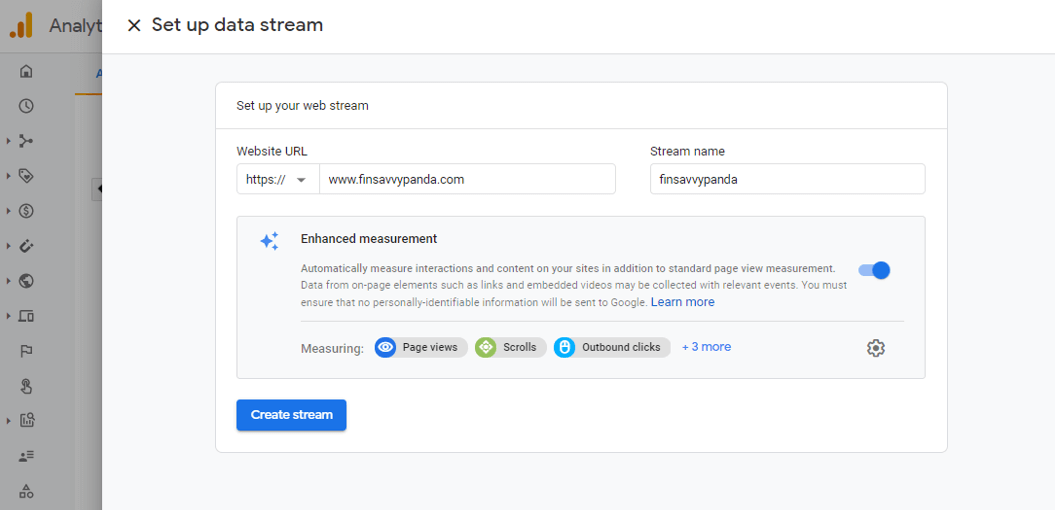
Step 2: Set up your data stream.
Type in your website address (aka your blog domain name) in the “Website URL” field and enter a name for the “Stream name.” For example, I used my domain name, finsavvypanda.com, for illustration purposes.
Select your preferences for “Enhanced measurement.” You can leave the options on default, which is enabled for all events.
Click on the “Create stream” button.
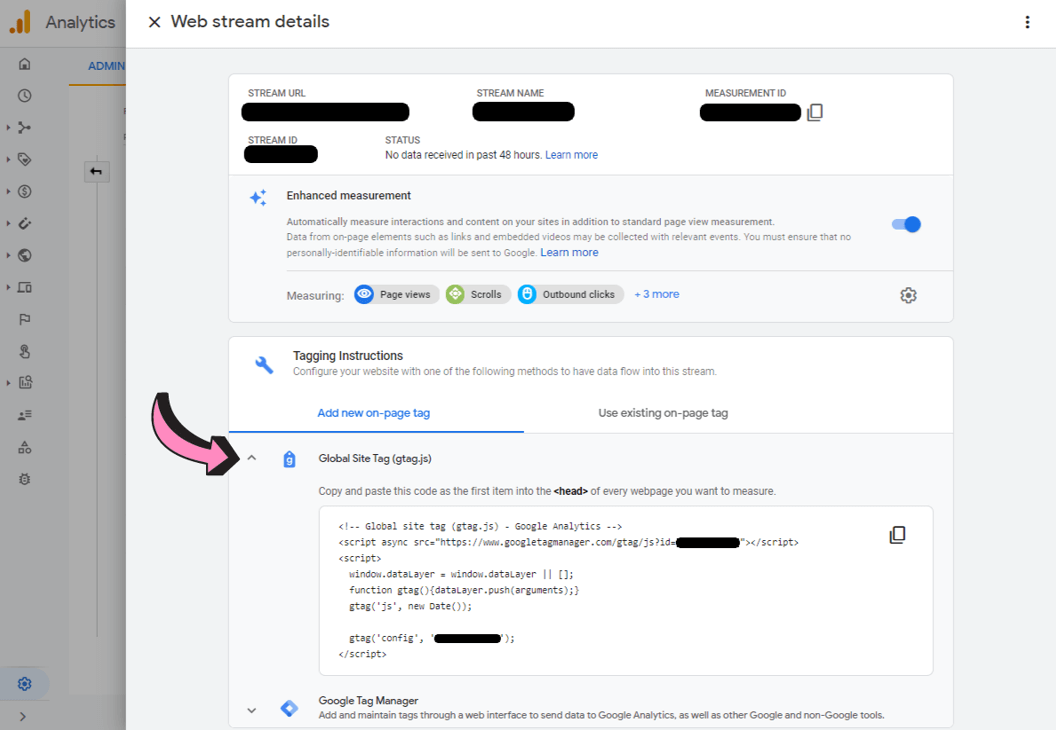
Step 3: Tagging instructions.
Under the “Tagging Instructions” section, click on the “Global Site Tag (gtag.js)” text to expand the area to get your Google Analytics trading code.
Copy the Google Analytics tracking code.
Step 4: Go into your WordPress dashboard.
Open a separate browser and log in to your WordPress site.
You can go to your WordPress dashboard through https://www.yourdomainname.com/wp-admin. Make sure your “yourdomainname.com” is your blog or website domain name and enter your WordPress login and password.
Click on “Settings > Insert Headers and Footers” from your WordPress dashboard.
If you haven’t done so already, install the “Insert Headers and Footers” plugin in your WordPress. This is plugin is required to move onto the next step.

Step 5: Simply copy and paste.
Copy and paste the Global Site Tag (gtag.js) code that Google Analytics gave you into the “Scripts in Header” box. It should look something like this:
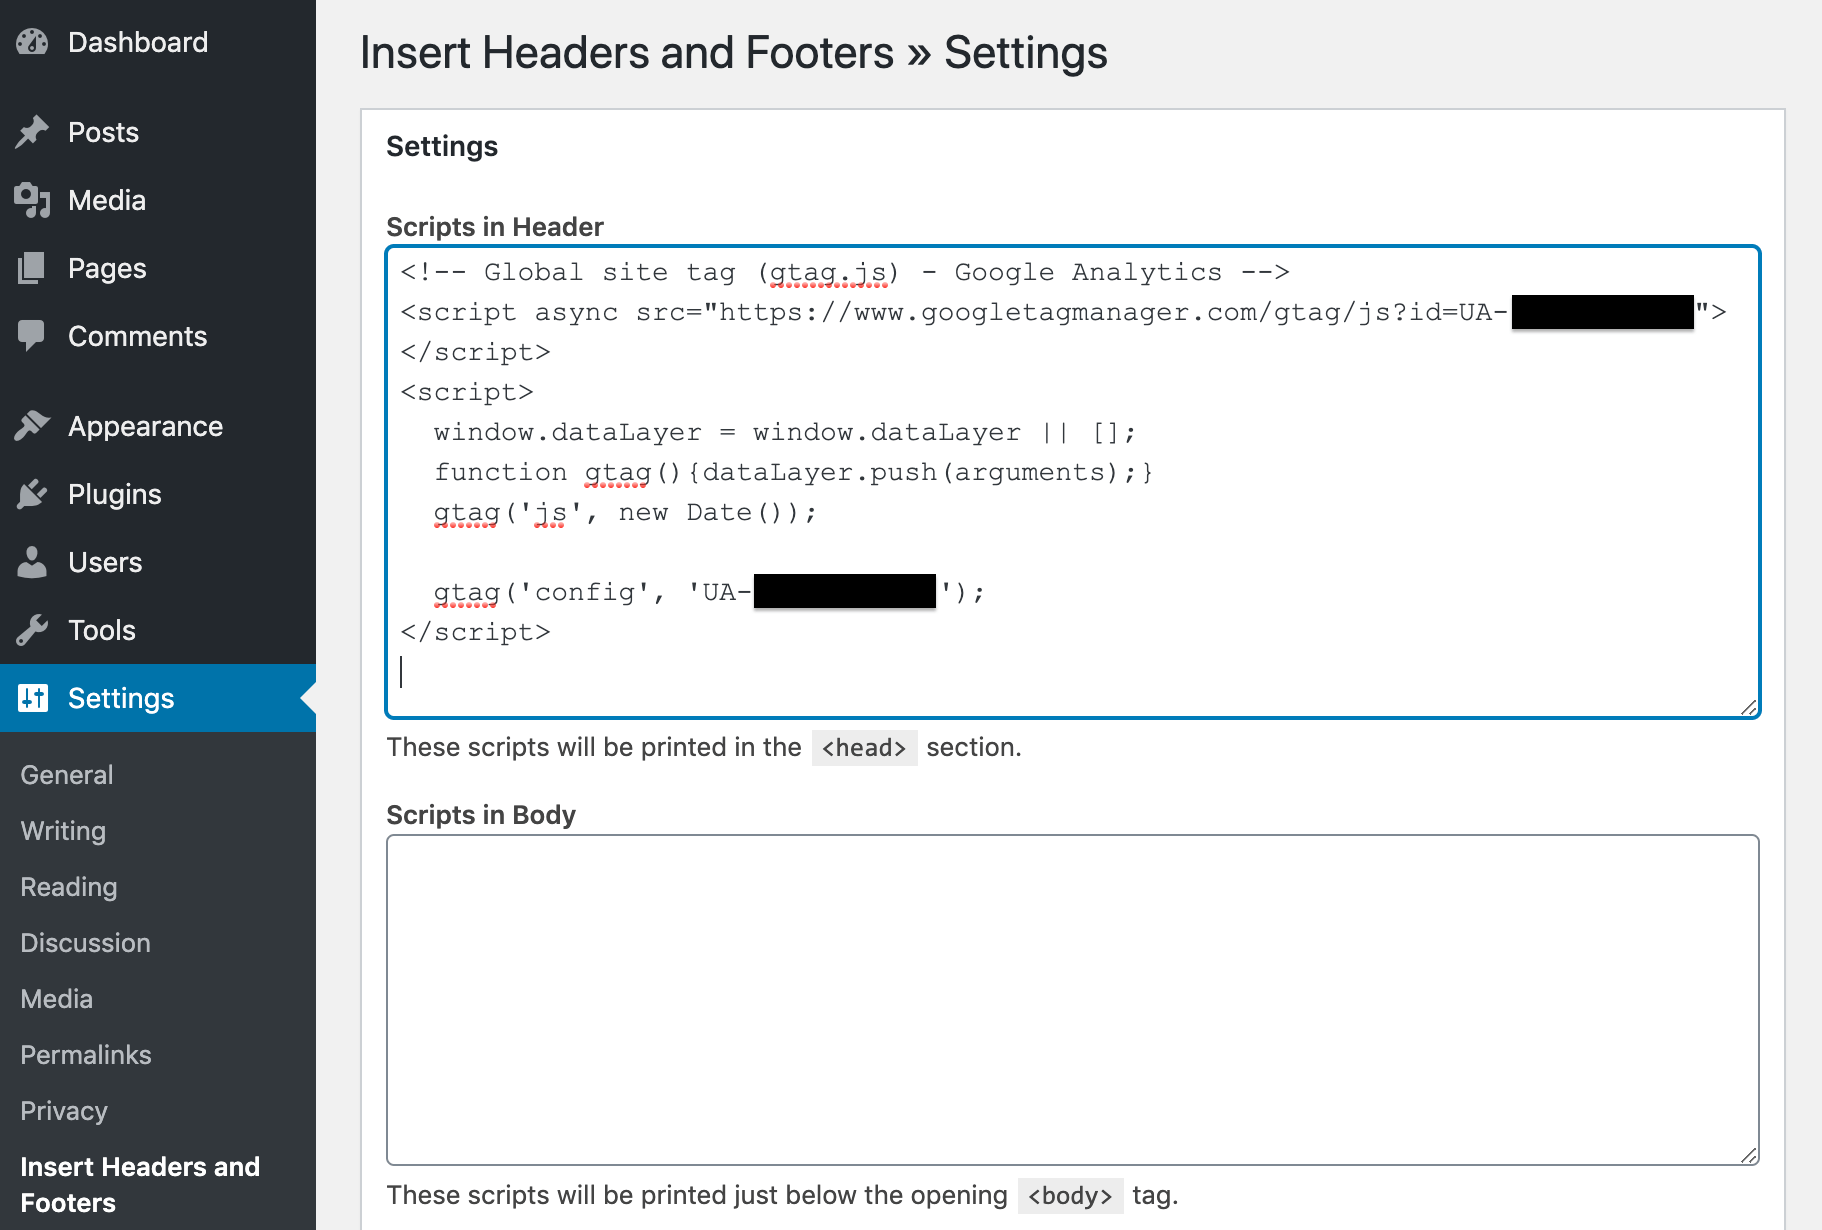
Make sure you hit the “Save” button at the bottom of the screen after you paste the code into the “Scripts in Header” box.
TA-DA – you’re done! Congratulations! You’ve successfully set up Google Analytics on WordPress!
Need extra help with setting up and launching your new blog?
If you’re brand new to the blogging world and you want a profitable roadmap to help you start and launch your blog, I highly recommend checking out this super affordable ebook, The Treasure Map To Blogging Success in Just 30 Days.
This ebook is jam-packed with a ton of valuable information to help beginners like you get started without feeling overwhelmed or spending hours and hours trying to search for information. Many of my students and readers have followed this in-depth guide to successfully launch their blogs the right way!
The Treasure Map To Blogging Success was created by me to help you save loads of time and money to help you get started on the right foot!

The Treasure Map To Blogging Success in Just 30 Days ebook
I hope you found this step by step tutorial on how to set up your Google Analytics account helpful!
As always, you can shoot me an email at ling@finsavvypanda.com and let me know if you have any questions about starting your blog. I’m happy to help! 🙂
Until then, happy blogging, my friend!
Hi! I am right in the middle of trying to paste my Google analytics tag into my dashboard but I can’t find where to paste it. I downloaded a plug in called Elementor that mentioned headers and footers. Is that not the correct plug in? I don’t have a settings section as displayed in your blog. Please advise!
Also, absolutely love the content and thank you for helping me make my foodie blog dreams come true. This is all very technical and I don’t understand half of it, but the dream is there!
Hi Ling,
I just want to start by letting you know how much I appreciate your content and guidance. I don’t think I would have been able to start my blog had it not been for your feedback and step by step guide.
I have a ton of questions but the one I haven’t been able to find the answer to is Google Analytics. I have my page up, I have 6 blog posts ready to go, Pintrest has been setup as well and I’m ready to create some pins after I publish the blog posts. The only thing I’m stuck at is, once I start getting traffic on my website, how to I leverage Google Analytics when applying for Display Advertising? is there a specific tool within Google Analytics that I need to learn for me to start advertising on my website?
Also- how soon can I apply for display advertising?
Hey Eliana
I’m glad you find my step by step guide helpful!
Google Analytics is used to check your traffic stats – i.e. the demographics of your visitors, their interests, and behavior. It doesn’t have anything to do with ad earnings. The only time you would use Google Analytics is when ad networks ask you for a screenshot to show them your traffic analytics when you submit an application, but Google Adsense doesn’t ask for this.
If your blog is less than 4-5 months old, I don’t recommend applying for ads yet. You should learn how to get traffic back to your blog before you attempt to apply for any ad networks. I believe you are using my ebook guide, The Treasure Map To Blogging Success in 30 Days. So you can check out Chapter 16 (on page 173) to read about the different advertising requirements. I have it all listed there for you! I hope this helps! 🙂